1.从官方github仓库拉取二进制文件
git clone https://github.com/nsqio/nsq.git
下完解压后,进入bin目录,下面有几个文件分别是
- nsqadmin webUI管理文件
- nsqd nsqd服务文件
- nsqlookupd nsqlookupd服务文件
- nsq_stat
- nsq_tail
- nsq_to_file 将消费者的消息写入文件,测试用
- nsq_to_http
- nsq_to_nsq
- to_nsq
2.单机部署
nohup ./nsqlookupd /dev/null > nohup.nsqlookupd.out 2>&1 &
nohup ./nsqd --lookupd-tcp-address=127.0.0.1:4160 > nohup.nsqd.out 2>&1 &  绑定注册和服务中心的ip协议端口
nohup ./nsqadmin --lookupd-http-address=127.0.0.1:4161 > nohup.nsqadmin.out 2>&1 & 绑定注册和服务中心的http协议端口
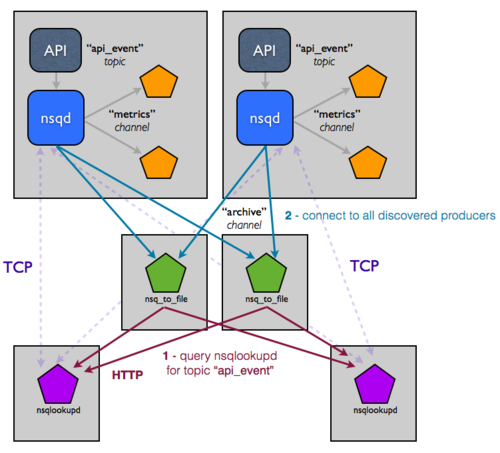
3.部署nsq集群(提前安装好docker)
上图为官方推荐的集群部署拓扑1.拉取nsq的docker镜像
  docker pull nsqio/nsq  #拉取nsq镜像
  docker images          #查看镜像
2.启动nsqlookupd:
docker run -d --name nsqlookupd -p 4160:4160 -p 4161:4161 nsqio/nsq /nsqlookupd #nsqlookupd的TCP端口为4160
3.启动两个nsq节点:
#节点1
  docker run --net host -v /media/guo/wd5400tb2/nsq:/media/nsq --name nsqd00 nsqio/nsq /nsqd --tcp-address :4150 --http-address :4151 --broadcast-address=192.168.6.100  --lookupd-tcp-address=192.168.6.100:4160 --data-path /media/nsq

  -v 指定挂载目录 -v /media/guo/st7200tb2/nsq:/media/nsq,把本机的/media/guo/st7200tb2/nsq挂载到/media/nsq目录下面

#节点2
docker run --net host -v /media/guo/st7200tb2/nsq:/media/nsq --name nsqd01 nsqio/nsq /nsqd --tcp-address :4250 --http-address :4251 --broadcast-address=192.168.6.100  --lookupd-tcp-address=192.168.6.100:4160 --data-path /media/nsq

--data-path /media/nsq指定nsqd数据保存目录
4.启动admin节点
docker run -d --name nsqadmin -p 4171:4171 nsqio/nsq /nsqadmin --lookupd-http-address=192.168.6.100:4161
5.使用自带工具测试消息生产与消费 发送消息
curl -X POST http://192.168.6.100:4151/topic/create?topic=test-topic 创建topic(队列)
创建channel(通道)
curl -X POST 'http://192.168.6.100:4151/channel/create?topic=test-topic&channel=test-channel'
生产者发送消息
curl -d 'hello world 1' 'http://192.168.6.100:4151/pub?topic=test-topic'
消费者处理消息
./nsq_to_file --topic=test-topic --output-dir=/tmp --lookupd-http-address=192.168.6.100:4161
3.使用go-nsq 库操作
生产者代码
package main

import (
	"fmt"
	"log"
	"time"

	"github.com/nsqio/go-nsq"
)

func main() {
	// Instantiate a producer.
	config := nsq.NewConfig()
	producer, err := nsq.NewProducer("192.168.250.2:4150", config)
	if err != nil {
		log.Fatal(err)
	}

	topicName := "topic"

	// Synchronously publish a single message to the specified topic.
	// Messages can also be sent asynchronously and/or in batches.
	for i := 0; i < 99999; i++ {
		messageBody := []byte(fmt.Sprintf("hello %d", i))
		err = producer.Publish(topicName, messageBody)
		if err != nil {
			log.Fatal(err)
		}

		time.Sleep(time.Second * time.Duration(1))
	}

	// Gracefully stop the producer when appropriate (e.g. before shutting down the service)
	producer.Stop()
}
消费者代码
package main

import (
	"fmt"
	"log"
	"os"
	"os/signal"
	"syscall"

	"github.com/nsqio/go-nsq"
)

func processMessage(m []byte) error {
	fmt.Printf("%s\n", m)
	return nil
}

type myMessageHandler struct{}

// HandleMessage implements the Handler interface.
func (h *myMessageHandler) HandleMessage(m *nsq.Message) error {
	if len(m.Body) == 0 {
		// Returning nil will automatically send a FIN command to NSQ to mark the message as processed.
		// In this case, a message with an empty body is simply ignored/discarded.
		return nil
	}

	// do whatever actual message processing is desired
	err := processMessage(m.Body)

	// Returning a non-nil error will automatically send a REQ command to NSQ to re-queue the message.
	return err
}

func main() {
	// Instantiate a consumer that will subscribe to the provided channel.
	config := nsq.NewConfig()
	consumer, err := nsq.NewConsumer("topic", "channel", config)
	if err != nil {
		log.Fatal(err)
	}

	// Set the Handler for messages received by this Consumer. Can be called multiple times.
	// See also AddConcurrentHandlers.
	consumer.AddHandler(&myMessageHandler{})

	// Use nsqlookupd to discover nsqd instances.
	// See also ConnectToNSQD, ConnectToNSQDs, ConnectToNSQLookupds.
	err = consumer.ConnectToNSQLookupd("192.168.250.2:4161")
	if err != nil {
		log.Fatal(err)
	}

	// wait for signal to exit
	sigChan := make(chan os.Signal, 1)
	signal.Notify(sigChan, syscall.SIGINT, syscall.SIGTERM)
	<-sigChan

	// Gracefully stop the consumer.
	consumer.Stop()
}
