Play Capacitor Cupid With The Matchmaker

Occasionally a design requires capacitors that are much closer to being identical in value to one another than the usual tolerance ranges afford. Precision matching of components from parts on hand might sound like a needle-in-a-haystack problem, but not with [Stephen Woodward]’s Capacitor Matchmaker design.

The larger the output voltage, the greater the mismatch between capacitors A and B.

The Matchmaker is a small circuit intended to be attached to a DVM, with the output voltage indicating whether two capacitors (A and B) are precisely matched in value. If they are not equal, the voltage output indicates the degree of the mismatch as well as which is the larger of the two.

The core of the design is complementary excitation of the two capacitors (the CD4013B dual flip-flop achieves this) which results in a measurable signal if the two capacitors are different; nominally 50 mV per % of mismatch. Output polarity indicates which of the capacitors is the larger one. In the case of the two capacitors being equal, the charges cancel out.

Can’t precision-matched capacitors be purchased? Absolutely, but doing so is not always an option. As [Stephen] points out, selection of such components is limited and they come at an added cost. If one’s design requires extra-tight tolerances, requires capacitor values or types not easily available as precision pairs, or one’s budget simply doesn’t allow for the added cost, then the DIY approach makes a lot more sense.

If you’re going to go down this road, [Stephen] shares an extra time-saving tip: use insulated gloves to handle the capacitors being tested. Heating up a capacitor before testing it — even just from one’s fingers — can have a measurable effect.

[Stephen]’s got a knack for insightful electronic applications. Check out his PWMPot, a simple DIY circuit that can be an awfully good stand-in for a digital potentiometer.

LeRobot Brings Autonomy To Hobby Robots

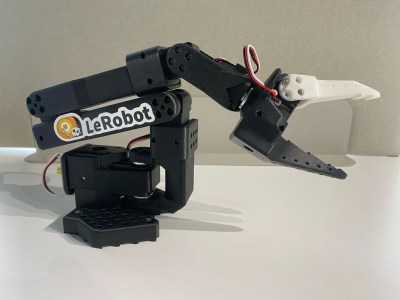
Robotic arms have a lot in common with CNC machines in that they are usually driven by a fixed script of specific positions to move to, and actions to perform. Autonomous behavior isn’t the norm, especially not for hobby-level robotics. That’s changing rapidly with LeRobot, an open-source machine learning framework from the Hugging Face community.

The SO-101 arm is an economical way to get started.

If a quick browse of the project page still leaves you with questions, you’re not alone. Thankfully, [Ilia] has a fantastic video that explains and demonstrates the fundamentals wonderfully. In it, he shows how LeRobot allows one to train an economical 3D-printed robotic arm by example, teaching it to perform a task autonomously. In this case, the task is picking up a ball and putting it into a cup.

[Ilia] first builds a dataset by manually operating the arm to pick up a ball and place it in a cup. Then, with a dataset consisting of only about fifty such examples, he creates a machine learning model capable of driving the arm to autonomously pick up a ball and place it in a cup, regardless of where the ball and cup actually are. It even gracefully handles things like color changes and [Ilia] moving the cup and ball around mid-task. You can skip directly to 34:16 to see this autonomous behavior in action, but we do recommend watching the whole video for a highly accessible yet deeply technical overview.

Continue reading “LeRobot Brings Autonomy To Hobby Robots”

RepRapMicron Promises Micro-fabrication For Desktops With New Prototype

3D printing has transformed how hobbyists fabricate things, but what additional doors would open if we could go even smaller? The µRepRap (RepRapMicron) project aims to bring fabrication at the micron and sub-micron scale to hobbyists the same way RepRap strove to make 3D printing accessible. New developments by [Vik Olliver] show a promising way forward, and also highlight the many challenges of going so small.

New Maus prototype is modular, setting the stage for repeatable and reliable 3D printing at the micro scale.

How exactly would a 3D printer do micro-fabrication? Not by squirting plastic from a nozzle, but by using a vanishingly tiny needle-like effector (which can be made at any workbench via electrochemical erosion) to pick up a miniscule amount of resin one dab a time, curing it with UV after depositing it like a brush deposits a dot of ink.

By doing so repeatedly and in a structured way, one can 3D print at a micro scale one “pixel” (or voxel, more accurately) at a time. You can see how small they’re talking in the image in the header above. It shows a RepRapMicron tip (left) next to a 24 gauge hypodermic needle (right) which is just over half a millimeter in diameter.

Moving precisely and accurately at such a small scale also requires something new, and that is where flexures come in. Where other 3D printers use stepper motors and rails and belts, RepRapMicron leverages work done by the OpenFlexure project to achieve high-precision mechanical positioning without the need for fancy materials or mechanisms. We’ve actually seen this part in action, when [Vik Olliver] amazed us by scribing a 2D micron-scale Jolly Wrencher 1.5 mm x 1.5 mm in size, also visible in the header image above.

Using a tiny needle to deposit dabs of UV resin provides the platform with a way to 3D print, but there are still plenty of unique problems to be solved. How does one observe such a small process, or the finished print? How does one handle such a tiny object, or free it from the build platform without damaging it? The RepRapMicron project has solutions lined up for each of these and more, so there’s a lot of discovery waiting to be done. Got ideas of your own? The project welcomes collaboration. If you’d like to watch the latest developments as they happen, keep an eye on the Github repository and the blog.

Tune In To “Higher Lower”, The Minimal Handheld Electronic Game

[Tommy] has a great write-up about designing and building a minimalistic handheld electronic game called “Higher Lower”. It’s an audio-driven game in which the unit plays two tones and asks the player to choose whether the second tone was higher in pitch, or lower. The game relies on 3D printed components and minimal electronics, limiting player input to two buttons and output to whatever a speaker stuck to an output pin from an ATtiny85 can generate.

Fastener-free enclosure means fewer parts, and on the inside are pots for volume and difficulty. We love the thoughtful little tabs that hold the rocker switch in place during assembly.

Gameplay may be straightforward, but working with so little raises a number of design challenges. How does one best communicate game state (and things like scoring) with audio tones only? What’s the optimal way to generate a random seed when the best source of meaningful, zero-extra-components entropy (timing of player input) happens after the game has already started? What’s the most efficient way to turn a clear glue stick into a bunch of identical little light pipes? [Tommy] goes into great detail for each of these, and more.

In addition to the hardware and enclosure design, [Tommy] has tried new things on the software end of things. He found that using tools intended to develop for the Arduboy DIY handheld console along with a hardware emulator made for a very tight feedback loop during development. Being able to work on the software side without actually needing the hardware and chip programmer at hand was also flexible and convenient.

We’ve seen [Tommy]’s work before about his synth kits, and as usual his observations and shared insights about bringing an idea from concept to kit-worthy product are absolutely worth a read.

You can find all the design files on the GitHub repository, but Higher Lower is also available as a reasonably-priced kit with great documentation suitable for anyone with an interest. Watch it in action in the video below.

Continue reading “Tune In To “Higher Lower”, The Minimal Handheld Electronic Game”

Save Cells From The Landfill, Get A Power Bank For Your Troubles

A hefty portable power bank is a handy thing to DIY, but one needs to get their hands on a number of matching lithium-ion cells to make it happen. [Chris Doel] points out an easy solution: salvage them from disposable vapes and build a solid 35-cell power bank. Single use devices? Not on his watch!

[Chris] has made it his mission to build useful things like power banks out of cells harvested from disposable vapes. He finds them — hundreds of them — on the ground or in bins (especially after events like music festivals) but has also found that vape shops are more than happy to hand them over if asked. Extracting usable cells is most of the work, and [Chris] has refined safely doing so into an art.

Disposable vapes are in all shapes and sizes, but cells inside are fairly similar.

Many different vapes use the same cell types on the inside, and once one has 35 identical cells in healthy condition it’s just a matter of using a compatible 3D-printed enclosure with two PCBs to connect the cells, and a pre-made board handles the power bank functionality, including recharging.

We’d like to highlight a few design features that strike us as interesting. One is the three little bendy “wings” that cradle each cell, ensuring cells are centered and held snugly even if they aren’t exactly the right size.  Another is the use of spring terminals to avoid the need to solder to individual cells. The PCBs themselves also double as cell balancers, providing a way to passively balance all 35 cells and ensure they are at the same voltage level during initial construction. After the cells are confirmed to be balanced, a solder jumper near each terminal is closed to bypass that functionality for final assembly.

The result is a hefty power bank that can power just about anything, and maybe the best part is that it can be opened and individual cells swapped out as they reach the end of their useful life. With an estimated 260 million disposable vapes thrown in the trash every year in the UK alone, each one containing a rechargeable lithium-ion cell, there’s no shortage of cells for an enterprising hacker willing to put in a bit of work.

Power banks not your thing? [Chris] has also created a DIY e-bike battery using salvaged cells, and that’s a money saver right there.

Learn all about it in the video, embedded below. And if you find yourself curious about what exactly goes on in a lithium-ion battery, let our own Arya Voronova tell you all about it.

Continue reading “Save Cells From The Landfill, Get A Power Bank For Your Troubles”

DIY AI Butler Is Simpler And More Useful Than Siri

[Geoffrey Litt] shows that getting an effective digital assistant that’s tailored to one’s own needs just needs a little DIY, and thanks to the kinds of tools that are available today, it doesn’t even have to be particularly complex. Meet Stevens, the AI assistant who provides the family with useful daily briefs. The back end? Little more than one SQLite table and a few cron jobs.

A sample of Stevens’ notebook entries, both events and things to simply remember.

Every day, Stevens sends a daily brief via Telegram that includes calendar events, appointments, weather notes, reminders, and even a fun fact for the day. Stevens isn’t just send-only, either. Users can add new entries or ask questions about items through Telegram.

It’s rudimentary, but [Geoffrey] already finds it far more useful than Siri. This is unsurprising, as it has been astutely observed that big tech’s digital assistants are designed to serve their makers rather than their users. Besides, it’s also fun to have the freedom to give an assistant its own personality, something existing offerings sorely lack.

Architecture-wise, the assistant has a notebook (the single SQLite table) that gets populated with entries. These entries come from things like reading family members’ Google calendars, pulling data from a public weather API, processing delivery notices from the post office, and Telegram conversations. With a notebook of such entries (along with a date the entry is expected to be relevant), generating a daily brief is simple. After all, LLMs (Large Language Models) are amazingly good at handling and formatting natural language. That’s something even a locally-installed LLM can do with ease.

[Geoffrey] says that even this simple architecture is super useful, and it’s not even a particularly complex system. He encourages anyone who’s interested to check out his project, and see for themselves how useful even a minimally-informed assistant can be when it’s designed with ones’ own needs in mind.

DIY Soldering Tweezers, Extra Thrifty

It started when [Mitxela] was faced with about a hundred incorrectly-placed 0603 parts. Given that he already owned two TS101 soldering irons, a 3D printer, and knows how to use FreeCAD (he had just finished designing a custom TS101 holder) it didn’t take long to create cost-effective DIY soldering tweezers.

Two screws allow adjusting the irons to ensure the tips line up perfectly.

The result works great! The TS101 irons are a friction-fit and the hinge (designed using the that-looks-about-right method) worked out just fine on the first try. Considering two TS101 irons are still cheaper than any soldering tweezer he could find, and one can simply undock the TS101s as needed, we call this a solid win.

One feature we really like is being able to precisely adjust the depth of each iron relative to each other, so that the tips can be made to line up perfectly. A small screw and nut at the bottom end of each holder takes care of that. It’s a small but very thoughtful design feature.

Want to give it a try? The FreeCAD design file (and .stl model) is available from [Mitxela]’s project page. Just head to the bottom to find the links.

We’ve seen DIY soldering tweezers using USB soldering irons from eBay but the TS101 has a form factor that seems like a particularly good fit.