Close Menu
    Facebook X (Twitter) Instagram Pinterest YouTube
    Trending
    • Disable SSH Password Login on Raspberry Pi
    • Elecrow Meteor IPS Touchscreen with RGB LEDs
    • Pi Pico Pinout Display on the Command Line
    • How to Add a Raspberry Pi Pico Reset Button
    • Pi Pico Onboard LED
    • Pi Pico W Pinout and Power Pins
    • CrowPi L Raspberry Pi Laptop and Learning Platform
    • Pi Pico W Launched
    Mastodon YouTube Facebook Instagram Pinterest RSS
    Raspberry Pi SpyRaspberry Pi Spy
    • Home
    • Categories
      • General
      • Hardware
      • Programming
      • Python
      • Software
      • Tutorials & Help
    • BerryClip
      • BerryClip Instructions
      • BerryClip Plus Instructions
      • Videos & Reviews
    • Buy
      • Buy Pi
      • Buy Pi Accessories
      • Buy Books
    • Tools
      • Ultimate Raspberry Pi Alexa Skill
      • Pi Power Estimator App
      • Pi-Lite 14×9 LED Matrix Sprite Editor
      • RPiREF Pin-out Reference App
      • Simple Ohm’s Law Calculator
      • Web Sites & Links
    • Tutorials & Help
        Featured
        November 9, 20200

        Raspberry Pi Temperature Monitoring

        Recent
        February 16, 2024

        Disable SSH Password Login on Raspberry Pi

        December 23, 2022

        How to Add a Raspberry Pi Pico Reset Button

        November 20, 2022

        Pi Pico Onboard LED

      1. Contact Us
      2. Site Map
      Raspberry Pi SpyRaspberry Pi Spy
      You are at:Home»Hardware»Interfaces»Using a Level Shifter With the Raspberry Pi GPIO

      Using a Level Shifter With the Raspberry Pi GPIO

      2
      By Matt on September 4, 2018 Interfaces, Tutorials & Help

      The Raspberry Pi GPIO pins work with 3.3V logic levels and are not 5V tolerant. If you apply 5V to a GPIO pin you risk permanently damaging it. However, you can easily use 5V sensors or modules if you convert their 5V outputs to 3.3V using a level shifter. This ensures the GPIO pins on the Pi only see a maximum of 3.3V. The shifters are usually bi-directional so they can also be used to allow the Pi to trigger a 5V input with it’s 3.3V outputs.

      Typical Level Shifter Module

      A level shifter (also known as a logic level converter) will take 5V signals and convert them to 3.3V. This allows the Pi to read outputs from sensors that are only happy being powered from 5V. The modules are cheap and often provide 4 or 8 channels.

      Logic Level Shifter Module

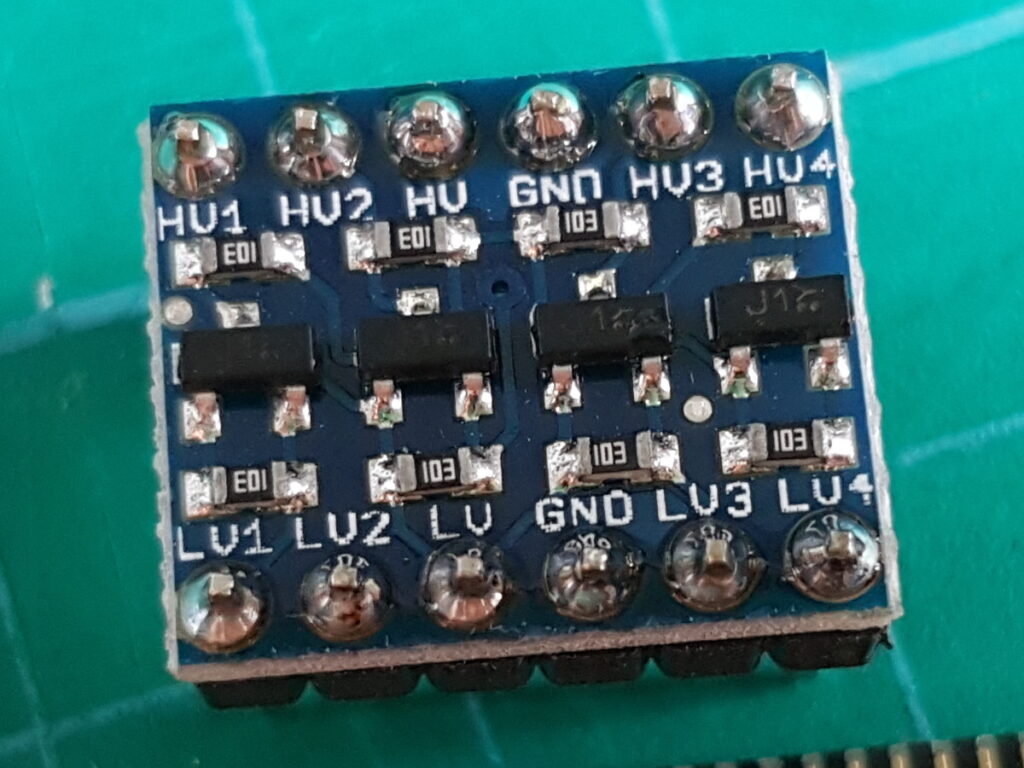
      The channels consist of a pair of pins labelled HV1/LV1, HV2/LV2 etc. The “HV” stands for “high value” and “LV” stands for “low value”. Channel 1 consists of LV1 and HV1, Channel 2 is LV2 and HV2 etc. There are also two pins which must be provided with reference voltages so that the module understands what our high and low values are.

      Example Level Shifter Circuit

      In the example below a 5V sensor is connected to one channel on a 4-channel level shifter. The other 3 channels could be used for other sensor inputs.

      Level Shifter Example Circuit

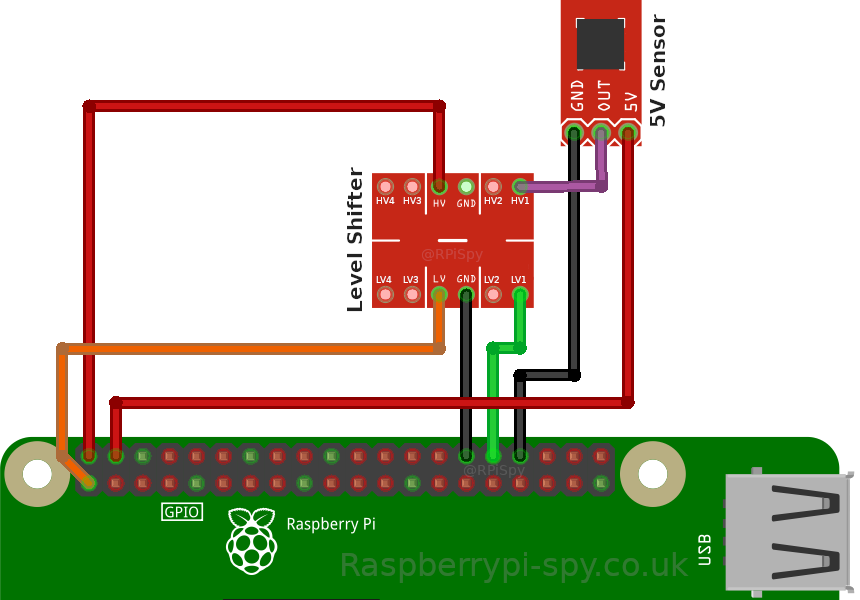
      The level shifter is connected to both the Pi’s GPIO and the sensor output :

      Level ShifterPi GPIOSensor
      HVPin 2 – 5V
      LVPin 1 – 3.3V
      GNDPin 30 – GND
      HV1OUT
      LV1Pin 32 (GPIO 12)

      The sensor is powered from the Pi’s 5V supply with the output going to the first HV pin on the level shifter.

      SensorLevel ShifterPi GPIO
      GNDPin 34 – GND
      OUTHV1
      5VPin 4 – 5V

      Although I used GPIO12 you could use any of the Pi’s GPIO inputs. Similarly you can use alternative 3.3V and ground connections. Take a look at the Pi GPIO reference diagram to check what is available :

      Raspberry Pi 40 Pin GPIO Header
      Raspberry Pi 40 Pin GPIO Header

      Multiple Channels

      The level shifters provide multiple channels as they are often sold to be used with I2C or SPI devices where you would need to convert multiple signals per device.

      Tips

      When to use a level shifter :

      • You want the Pi to read logic levels that are above 3.3V
      • You are using a 5V module that doesn’t work properly using 3.3V and you have no choice but to use 5V

      When you don’t need to use a level shifter :

      • The device is powered from 3.3V as its logic outputs will be 3.3V
      • The module is 5V but only takes inputs. The Pi’s 3.3V pins are usually fine for triggering devices that use 5V logic as they usually trigger with anything above 3V

      Troubleshooting

      In order for the circuit above to function correctly you need to make sure that :

      • the high-level (“HV”) side of the module is only ever connected to the 5V power or signal pins
      • the low-level (“LV”) side of the module is only ever connected to the 3.3V power or signal pins
      • the HV, LV and GND pins are connected to the 5V, 3.3V and Ground pins on the Pi’s GPIO

      Buy a Level Shifter

      You can buy level shifter modules from The PiHut, eBay or [easyazon_link keywords=”level shifter module 3.3V” locale=”UK” tag=”rpispy-21″]Amazon[/easyazon_link] for only a few £/$.

      Look out for multiple packs. Given their low price you might as well buy 3-5 and keep some spares in your electronics box.

      Share. Facebook Twitter Pinterest LinkedIn Tumblr Email
      Previous ArticleCreate an I2C OLED Display Slideshow with Python
      Next Article Raspberry Pi 7-Segment LED Display Module using Python

      Related Posts

      Disable SSH Password Login on Raspberry Pi

      How to Add a Raspberry Pi Pico Reset Button

      Pi Pico Onboard LED

      2 Comments

      1. Yasuni98 on May 8, 2021 7:38 am

        don’t we need to connect the HV side GND of the level shifter to the raspberry pi GND pin?

        Reply
        • Matt on May 8, 2021 11:13 am

          I think the two Gnd pins are the same so you only have to connect one of them.

          Reply
      Leave A Reply Cancel Reply

      This site uses Akismet to reduce spam. Learn how your comment data is processed.

      Recent Posts
      February 16, 2024

      Disable SSH Password Login on Raspberry Pi

      March 13, 2023

      Elecrow Meteor IPS Touchscreen with RGB LEDs

      December 26, 2022

      Pi Pico Pinout Display on the Command Line

      December 23, 2022

      How to Add a Raspberry Pi Pico Reset Button

      November 20, 2022

      Pi Pico Onboard LED

      Categories
      • 1-wire
      • 3D Printing
      • Add-ons
      • BBC Micro:bit
      • BerryClip
      • Books
      • Camera Module
      • Cases
      • Events
      • General
      • Hardware
      • I2C
      • Infographics
      • Interfaces
      • Minecraft
      • Model A+
      • Model B+
      • News
      • Pi Models
      • Pi Pico
      • Pi Zero
      • Power
      • Programming
      • Python
      • Raspberry Pi OS
      • Raspbian
      • RetroGaming
      • Robotics
      • Sensors
      • Software
      • SPI
      • Tutorials & Help
      Tags
      Arduino audio battery berryclip Birthday bluetooth cambridge camera CamJam DigiMakers display games GPIO I2C interface Kickstarter Kodi LCD LED Linux media Minecraft Model A motionEyeOS PCB photography photos Pi-Lite Pi Pico power python Raspberry Jam Raspberry Pi Bootcamp raspbian Retrogaming retroPie screen SD card security sensor SPI SSH temperature ultrasonic video
      Raspberry PI Related
      • Adafruit Blog
      • Average Maker
      • Official RaspBerry Pi Site
      • Raspberry Pi Pod
      • RasPi.tv
      • RaspTut
      • Stuff About Code
      Tech Resources
      • MattsBits – Pi Resources
      • Microbit Spy
      • Technology Spy
      Archives

      Entries RSS | Comments RSS

      This site is not associated with the official Raspberrypi.org site or the Raspberry Pi Foundation. Raspberry Pi is a trademark of the Raspberry Pi Foundation.

      Copyright © 2025 - All Rights Reserved - Matt Hawkins

      About

      Unofficial site devoted to the Raspberry Pi credit card sized computer offering tutorials, guides, resources,scripts and downloads. We hope to help everyone get the most out of their Pi by providing clear, simple articles on configuring, programming and operating it.

      Popular Posts
      September 19, 2014

      Top 5 Reasons The Raspberry Pi Sucks

      July 27, 2012

      16×2 LCD Module Control Using Python

      October 20, 2013

      Analogue Sensors On The Raspberry Pi Using An MCP3008

      Latest Posts
      February 16, 2024

      Disable SSH Password Login on Raspberry Pi

      March 13, 2023

      Elecrow Meteor IPS Touchscreen with RGB LEDs

      December 26, 2022

      Pi Pico Pinout Display on the Command Line

      Mastodon YouTube Instagram Facebook Pinterest RSS

      Entries RSS | Comments RSS

      This site is not associated with the official Raspberrypi.org site or the Raspberry Pi Foundation. Raspberry Pi is a trademark of the Raspberry Pi Foundation.

      Copyright © 2025 - All Rights Reserved - Matt Hawkins

      mastodon.social@RPiSpy

      Type above and press Enter to search. Press Esc to cancel.