Note: If you're new to TypeScript, check our Getting Started with TypeScript tutorial first.
The TypeScript if...else statement is used to execute/skip a block of code based on a condition.
Here's a simple example of the if...else statement. You can read the rest of the tutorial to learn more.
Example
let quantity: number = 35;

// Check if quantity is a positive number
if (quantity > 0) {
    console.log("Positive number");
}
// Else, check if quantity is negative
else if (quantity < 0) {
    console.log("Negative number");
}
// If both conditions fail, quantity is 0
else {
    console.log("Zero");
}

// Output: Positive number.
In the above example, the program displays
Positive numberif quantity is greater than 0.Negative numberif quantity is less than 0.Zeroif none of the conditions match.
TypeScript if Statement
We use the if keyword to execute code based on some specific condition.
The syntax of if statement is:
if (condition) {
    // Block of code
}
The if keyword checks the condition inside the parentheses (). If the condition is evaluated to:
true- The code inside{ }is executed.false- The code inside{ }is skipped.
Note: The code inside { } is also called the body of the if statement.

Example 1: TypeScript if Statement
// Program to check if the student passed

let score: number = 96;

// Check if score is greater than 40
if (score >= 40) {
    // The body of the if statement
    console.log("You passed the examination.");
}

console.log("Program executed!");
Output
You passed the examination.
Program executed!
In the above program, the condition score >= 40 evaluates to true since the score is 96. Thus, the body of the if statement is executed.
Had the value of the score been lower than 40 (say, 35), then the body of the if statement wouldn't have been executed.
Finally, since console.log("Program executed!"); is outside the body of the if statement, it is executed regardless of the results of the if statement.
TypeScript else Statement
The else keyword executes a block of code when the condition in the preceding if statement evaluates to false.
Note: The else statement should always follow an if statement. In other words, the if and else statements are parts of a single conditional structure.
The syntax of the if...else statement is:
if (condition) {
    // Block of code to execute if the condition is true
}
else {
    // Block of code to execute if the condition is false
}
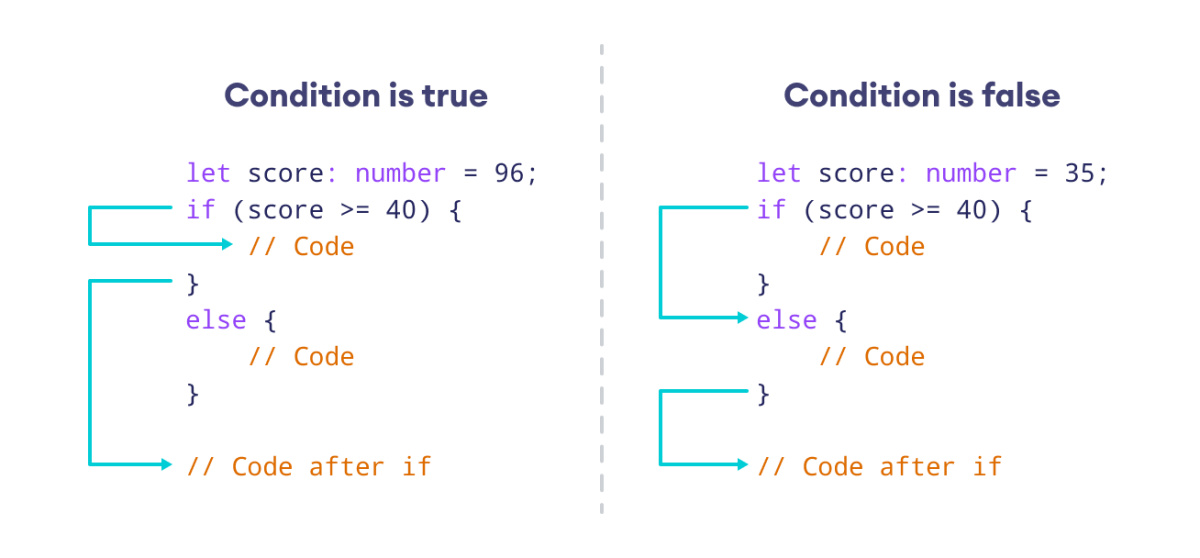
The if...else statement checks condition and executes code in two ways:
- If
conditionistrue, the code insideifis executed. And, the code insideelseis skipped. - If
conditionisfalse, the code insideifis skipped. Instead, the code insideelseis executed.

Example 2: TypeScript if…else Statement
// Program to check if the student passed or failed

let score: number = 35;

// Check if score is greater than 40
if (score >= 40) {
    // The body of the if statement
    console.log("You passed the examination.");
}
else {
    // The body of the else statement
    console.log("You failed the examination.");
}

console.log("Program executed!");
Output
You failed the examination.
Program executed!
Since score is 35, the if condition (score >= 40) evaluates to false.
Thus, the code inside if is skipped. And, the code inside else is executed.
Omit {}
We can omit { } in if…else statements when we have a single line of code to execute. For example,
let score: number = 35;

if (score >= 40)
    console.log("You passed the examination.");
else
    console.log("You failed the examination.");

// Output: You failed the examination.
TypeScript else if Statement
The else if keyword is used to check for additional conditions if the initial if statement is false.
The syntax of the else if statement is:
// Check for first condition
if (condition1) {
    // if body
}

// Check for second condition
else if (condition2){
    // else if body
}

// If no condition matches
else {
    // else body
}
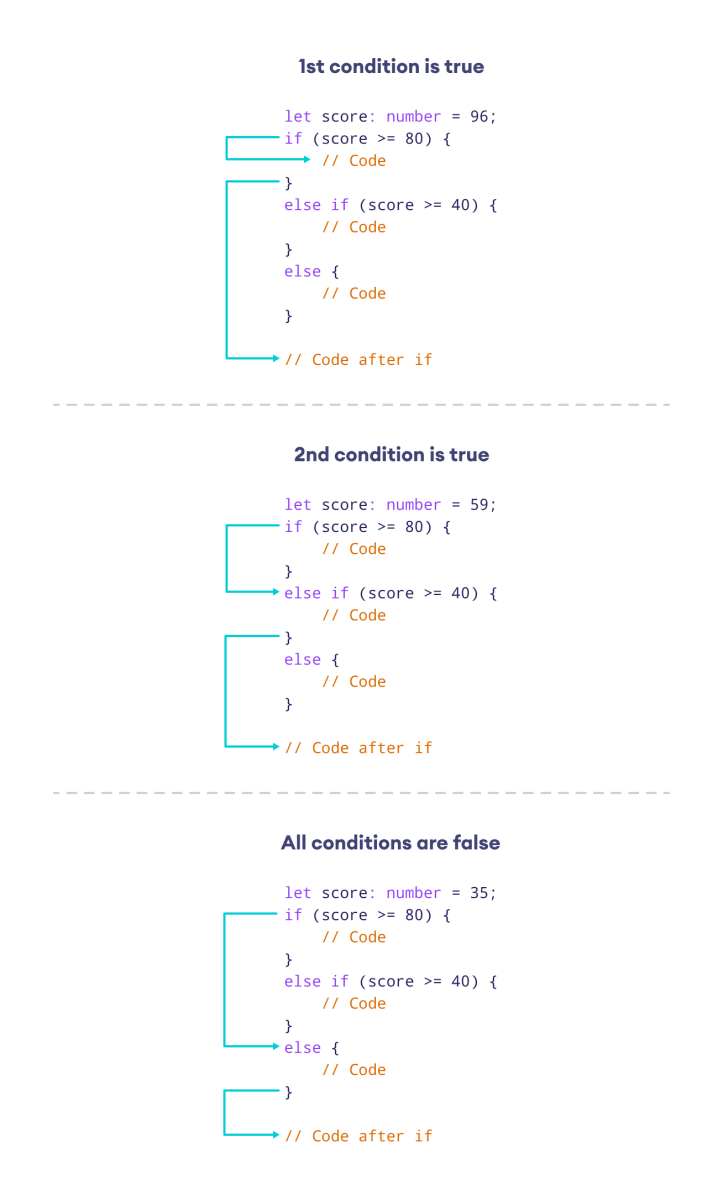
Here:
- First, the condition in the
ifstatement is checked. If the condition evaluates totrue, the body ofifis executed, and the rest is skipped. - Otherwise, the condition in the
else ifstatement is checked. Iftrue, its body is executed and the rest is skipped. - Finally, if no condition matches, the block of code in
elseis executed.

Example 3: TypeScript if...else if Statement
let score: number = 59;

// Check if score is 80 or above
if (score >= 80) {
    console.log("Excellent!");
}
// Else, check if score 40 or above
else if (score >= 40) {
    console.log("Average");
}
// If both conditions fail, you fail the exam
else {
    console.log("Failure!");
}
Output
Average
Here, the if condition is false because score is 59. However, the else if condition is satisfied, so the program prints Average.
Multiple else if
We can use the else if keyword as many times as we want. For example,
let score: number = 85;

// Condition for passing with second division
if (score >= 40 && score < 60) {
    console.log("Second division");
}
// Condition for passing with first division
else if (score >= 60 && score < 80) {
    console.log("First division");
}
// Condition for passing with distinction
else if (score >= 80 && score <= 100) {
    console.log("Distinction");
}
// Condition for failing the exam
else if (score > 0 && score < 40) {
    console.log("You failed the examination.");
}
// If all conditions fail, the score is invalid
else {
    console.log("Invalid score!");
}

// Output: Distinction
In the above example, we used three else if statements.
The second else if statement was executed as its condition was satisfied, while the conditions of the if and the first else if statements were not satisfied.
Nested if...else Statement
When we use an if...else statement inside another if...else statement, we create a nested if...else statement. For example,
let score: number = 60;

// Outer if...else statement
// Student passed if score 40 or above
// Otherwise, student failed

if (score >= 40) {

    // Inner if...else statement
    // Distinction if score is 80 or above

    if (score >= 80) {
        console.log("Distinction");
    }
    else {
        console.log("Passed");
    }
}

else {
    console.log("Failed");
}

// Output: Passed
Outer if...else statement
In the above example, the outer if condition checks if a student has passed or failed using the condition score >= 40. If it evaluates to false, the outer else statement will print "Failed".
On the other hand, if score >= 40 evaluates to true, the program moves to the inner if...else statement.
Inner if...else statement
The inner if condition checks whether the student has passed with distinction using the condition score >= 80.
If score >= 80 evaluates to true, the inner if statement will print "Distinction".
Otherwise, the inner else statement will print "Passed".
Note: Avoid nesting multiple if…else statements within each other to maintain code readability and simplify debugging.
More on TypeScript if...else Statement
We can use the ternary operator ?: instead of an if...else statement if our operation is very simple. For example,
let score: number = 40;
let result;

if (score >= 40)
    result = "pass"
else
    result = "fail"

console.log(result);

// Output: pass
can be written as
let score: number = 40;

let result = (score >= 40) ? "pass" : "fail";

console.log(result);

// Output: pass
We can replace our if…else statement with the switch statement when we deal with a large number of conditions.
For example,
let score: string = "C";

// Using if else for many conditions
// First condition
if (score === "A") {
    console.log("Excellent!");
}
// Second condition
else if (score === "B") {
    console.log("Good!");
}
// Third condition
else if (score === "C") {
    console.log("Average");
}
// Fourth condition
else if (score === "D") {
    console.log("Bad");
}
// Otherwise, execute else block
else {
    console.log("Fail");
}

// Output: Average
In the above example, we used if…else to evaluate five conditions, including the else block.
Now, let's use the switch statement for the same purpose.
let score: string = "C";

// using switch...case
switch (score) {
    // First condition
    case "A":
        console.log("Excellent!");
        break;
    // Second condition
    case "B":
        console.log("Good!");
        break;
    // Third condition
    case "C":
        console.log("Average");
        break;
    // Fourth condition
    case "D":
        console.log("Bad");
        break;
    default:
        console.log("Fail");
}

// Output: Average
As you can see, the switch statement makes our code more readable and maintainable.
In addition, switch is faster than long chains of if…else statements.
We can use logical operators such as && and || within an if statement to add multiple conditions. For example,
let age: number = 35;
let salary: number = 6000;

// Combine two conditions using the "and" operator &&
if (age >= 30 && salary >= 5000) {
    console.log("Eligible for premium membership.");
}
else {
    console.log("Not eligible for premium membership.");
}

// Output: Eligible for premium membership.
Here, we used the logical operator && to add two conditions in the if statement.
Yes, you can use user input inside your if...else statement. Just make sure that you've converted the input to a suitable type. For example,
// Get user input from prompt(), which returns either string or null data
const userInput: string | null = prompt("Enter your exam score:");

// Check if user input is null
if (userInput === null) {
    console.log("Null input given!");
}
// Else, convert input to integer and check condition
else {
    let score: number = parseInt(userInput);

    // Check if the user passed or failed
    if (score >= 40)
        console.log("pass");
    else
        console.log("fail");
}
Here, we used the prompt() function to get user input. If the user provides the input data, prompt() will return it as string.
But if the user presses the Cancel button, prompt() will return null. Thus, we need to check for this condition.
Once we've determined that the input is not null, we can then proceed to convert the input into an integer using the parseInt() function, and then check if the user passed or failed.
Also Read: