- Next.js - Home
- Next.js - Overview
- Next.js - Project Setup
- Next.js - Folder Structure
- Next.js - App Router
- Next.js - Page Router
- Next.js Features
- Next.js - Pages
- Next.js - Data Fetching
- Next.js - ISR
- Next.js - Static File Serving
- Next.js - Pre-Rendering
- Next.js - Partial Pre Rendering
- Next.js - Server Side Rendering
- Next.js - Client Side Rendering
- Next.js Routing
- Next.js - Routing
- Next.js - Nested Routing
- Next.js - Dynamic Routing
- Next.js - Parallel Routing
- Next.js - Imperative Routing
- Next.js - Shallow Routing
- Next.js - Intercepting Routes
- Next.js - Redirecting Routes
- Next.js - Navigation and Linking
- Next.js Configuration
- Next.js - TypeScript
- Next.js - Environment Variables
- Next.js - File Conventions
- Next.js - ESLint
- Next.js API & Backend
- Next.js - API Routes
- Next.js - Dynamic API Routes
- Next.js - Route Handlers
- Next.js - API MiddleWares
- Next.js - Response Helpers
- Next.js API Reference
- Next.js - CLI Commands
- Next.js - Functions
- Next.js - Directives
- Next.js - Components
- Next.js - Image Component
- Next.js - Font Component
- Next.js - Head Component
- Next.js - Form Component
- Next.js - Link Component
- Next.js - Script Component
- Next.js Styling & SEO
- Next.js - CSS Support
- Next.js - Global CSS Support
- Next.js - Meta Data
- Next.js Advanced Topics
- Next.js - Error Handling
- Next.js - Server Actions
- Next.js - Fast Refresh
- Next.js - Internationalization
- Next.js - Authentication
- Next.js - Session Management
- Next.js - Authorization
- Next.js - Caching
- Next.js - Data Caching
- Next.js - Router Caching
- Next.js - Full Route Caching
- Next.js - Request Memoization
- Next.js Performance Optimization
- Next.js - Optimizations
- Next.js - Image Optimization
- Next.js - Lazy Loading
- Next.js - Font Optimization
- Next.js - Video Optimization
- Next.js - Script Optimization
- Next.js - Memory Optimization
- Next.js - Using OpenTelemetry
- Next.js - Package Bundling Optimization
- Next.js Testing
- Next.js - Testing
- Next.js - Testing with Jest
- Next.js - Testing with Cypress
- Next.js - Testing with Vitest
- Next.js - Testing with Playwright
- Next.js Debugging & Deployment
- Next.js - Debugging
- Next.js - Deployment
- Next.js Useful Resources
- Next.js - Interview Questions
- Next.js - Quick Guide
- Next.js - Useful Resources
- Next.js - Discussion
Next.js - Environment Setup
Next.js is a popular React-based framework that uses Node.js as the runtime for server-side rendering and development. To set up a Next.js environment, we first need to configure the Node.js environment. In this chapter, we will learn how to set up Node.js, install Next.js, and run a Next.js server.
Prerequisites
Before starting, make sure you have installed following tools in your system:
- Install Node.js (Version 14.6.0 or newer)
- Download and install VSCode from official site.
- Basic knowledge of React environment.
Steps to Setup Next.js Environment
Following section describes step-by-step procedure for setting up Next.js environment.
Step 1: Create a New Next.js Application
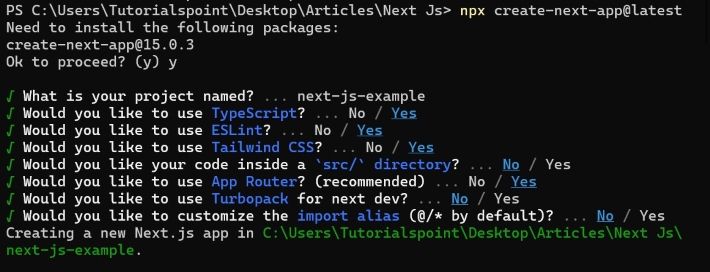
Next.js have a built in tool "create-next-app" to make a project with fully functional configuration. To create a application, open your terminal/powershell in the folder where you want to build app. Then run the following command (same for mac/linux/windows).
npx create-next-app@latest
After running this you will be prompted to give name for your project. Enter a suitable name, and then you will be asked to select tools to be installed along with Next.js. Using left arrow, right arrow and enter key, select Typescript, Tailwind CSS and ESlint. Use the image below as reference.
Step 2: Understand The Project Structure
After successfully create new Next.js app, you can see a new folder with lots of file in the directory you selected. Now in the terminal, navigate to this directory using following command. (Replace name of your app in command)
cd next-js-example
This will open project directory in terminal. The "next-js-example" folder will look something like this.
next-js-example/
     /public/
     /app/
     /styles/
     .gitignore
     package.json
     README.md
     next.config.js
Here is overview some of important files and folders.
- /public/: Folder that contains static files like images and fonts
- /app/: Folder that stores all the React components.
- /styles/: Folder that contains CSS files for styling.
- package.json: A file that lists project dependencies and scripts.
You can ignore rest of folders and files, as they are not frequently used in next.js development.
Step 3: Run the Development Server
Now, we can run the Next.js development server using following command. (Make sure you are in project directory, ie next-js-example)
npm run dev
On successfully running this command, a new Next.js server will be set up at http://localhost:3000/. Your default browser will open this page automatically for you. Here is how it look like.

Step 4: Setup Development Environment
Now everything is set. You can start editing "/app/page.tsx" to see changes in output. Here I can suggest some VS code extension that can help with Next.js development.
- ES7 React Snippet: This extension provides handy code snippets for React, Redux, and other libraries, reducing boilerplate code. For example, you can quickly generate functional components or `useEffect` hooks with simple shortcuts.
- JavaScript and TypeScript Nightly : This extension updates your VS Code with nightly builds of JavaScript and TypeScript language features.
- Tailwind CSS Intellisense: If you are using tailwind CSS in your project, this extension will be useful. It can provide intelligent suggestion for tailwind css code.