- Next.js - Home
- Next.js - Overview
- Next.js - Project Setup
- Next.js - Folder Structure
- Next.js - App Router
- Next.js - Page Router
- Next.js Features
- Next.js - Pages
- Next.js - Data Fetching
- Next.js - ISR
- Next.js - Static File Serving
- Next.js - Pre-Rendering
- Next.js - Partial Pre Rendering
- Next.js - Server Side Rendering
- Next.js - Client Side Rendering
- Next.js Routing
- Next.js - Routing
- Next.js - Nested Routing
- Next.js - Dynamic Routing
- Next.js - Parallel Routing
- Next.js - Imperative Routing
- Next.js - Shallow Routing
- Next.js - Intercepting Routes
- Next.js - Redirecting Routes
- Next.js - Navigation and Linking
- Next.js Configuration
- Next.js - TypeScript
- Next.js - Environment Variables
- Next.js - File Conventions
- Next.js - ESLint
- Next.js API & Backend
- Next.js - API Routes
- Next.js - Dynamic API Routes
- Next.js - Route Handlers
- Next.js - API MiddleWares
- Next.js - Response Helpers
- Next.js API Reference
- Next.js - CLI Commands
- Next.js - Functions
- Next.js - Directives
- Next.js - Components
- Next.js - Image Component
- Next.js - Font Component
- Next.js - Head Component
- Next.js - Form Component
- Next.js - Link Component
- Next.js - Script Component
- Next.js Styling & SEO
- Next.js - CSS Support
- Next.js - Global CSS Support
- Next.js - Meta Data
- Next.js Advanced Topics
- Next.js - Error Handling
- Next.js - Server Actions
- Next.js - Fast Refresh
- Next.js - Internationalization
- Next.js - Authentication
- Next.js - Session Management
- Next.js - Authorization
- Next.js - Caching
- Next.js - Data Caching
- Next.js - Router Caching
- Next.js - Full Route Caching
- Next.js - Request Memoization
- Next.js Performance Optimization
- Next.js - Optimizations
- Next.js - Image Optimization
- Next.js - Lazy Loading
- Next.js - Font Optimization
- Next.js - Video Optimization
- Next.js - Script Optimization
- Next.js - Memory Optimization
- Next.js - Using OpenTelemetry
- Next.js - Package Bundling Optimization
- Next.js Testing
- Next.js - Testing
- Next.js - Testing with Jest
- Next.js - Testing with Cypress
- Next.js - Testing with Vitest
- Next.js - Testing with Playwright
- Next.js Debugging & Deployment
- Next.js - Debugging
- Next.js - Deployment
- Next.js Useful Resources
- Next.js - Interview Questions
- Next.js - Quick Guide
- Next.js - Useful Resources
- Next.js - Discussion
Next.js - Testing With Jest
In this chapter, we will explore Jest testing framework, how to setup Jest in Next.js application and how to write tests for Next.js components, hooks, and functions.
What is Jest?
Jest is a popular JavaScript testing framework developed by Facebook. It is commonly used in React applications and hence it also works well with Next.js applications. Jest provides inbuilt functionalities and feature for code coverage reporting, snapshot testing for UI components, and mocking capabilities for external dependencies. With Jest, you can easily write tests that simulate user interactions and verify that components render. For example, you can test if a button click triggers the correct function or if an API route returns the expected response. Learn to use Jest framework from our Jest Tutorial.
Create a Next.js application with Jest
In Next.js, you can create a new project with Jest and React Testing Library already configured. To create a new Next.js project with Jest, run the following command:
npx create-next-app@latest --example with-jest
This will create a new Next.js project with Jest and React Testing Library already configured. The project will include, pre-configured jest.config.js, pre-configured jest.setup.js, example test files and all necessary dependencies.
Setting Up Jest in a Next.js Application
Setting up Jest in an existing Next.js application is little complicated. You have to manually setup dependencies, devDependencies and other scripts. The following section will guide you through the process of setting up Jest in a Next.js application.
Step 1. Install Jest and React Testing Library
In your existing Next.js project directory, install Jest and React Testing Library in your Next.js application:
// Install Jest
npm install --save-dev jest

// Install React Testing Library
npm install --save-dev @testing-library/react @testing-library/jest-dom
Step 2. Create Jest Configuration
Create a jest.config.js file in the root folder of your project and add the following configuration:
// File - /jest.config.js

module.exports = {
    testPathIgnorePatterns: [ "<rootDir>/.next/",
                              "<rootDir>/node_modules/"],
    setupFilesAfterEnv: ["<rootDir>/jest.setup.js"],
    testEnvironment: "jsdom",
};
Step 3. Add scripts in Package file
Add the following scripts in the package.json file or your root directory:
// File - /package.json

{
    "scripts": {
      "test": "jest",
      "test:watch": "jest --watch"
    }
}
Step 4. Create __tests__ directory
Create a __tests__ directory in the root folder of your project. This is where you will store all your test files. Any testing file inside this directory will end with '.test.tsx' or '.test.jsx' extension.
Writing Tests in Next.js with Jest
After setting up Jest in your Next.js application, you can start writing tests for your components, hooks, and functions. In the following section, we will write a test for a Next.js home page.
Create a Next.js Component
To test a component in Next.js, first we need to create a Next.js component. In the following code, we are creating a simple Home component that renders a welcome message and a button. When the button is clicked, it triggers an alert function.
// File - app/Home/page.tsx

export default function Home() {
    return (
        <div>
            <h1>Welcome to Next.js</h1>
            <button onClick={() => alert('Hello!')}>
                Click Me
            </button>
        </div>
    );
}
Create a Test File
Create a test file for the Home component in the __tests__ directory. The test file should end with '.test.tsx' or '.test.jsx' extension. In the following code, we are testing if the above Home component renders the welcome message and if the button click triggers the alert function. Learn how to write test in Jest from our Jest Tutorial.
// File - /__tests__/Home.test.tsx

import { render, screen, fireEvent } from '@testing-library/react';
import Home from '@/pages/index';

describe('Home Page', () => {
    it('renders welcome message', () => {
        render(<Home />);
        expect(screen.getByText('Welcome to Next.js')).toBeInTheDocument();
    });

    it('handles button click', () => {
        render(<Home />);
        const alertMock = jest.spyOn(window, 'alert').mockImplementation();

        fireEvent.click(screen.getByText('Click Me'));
        expect(alertMock).toHaveBeenCalledWith('Hello!');

        alertMock.mockRestore();
    });
});
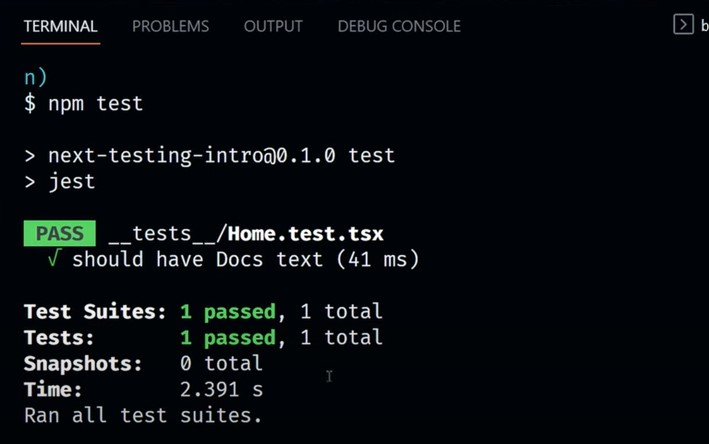
Run the Test
After writing the test, yoc can run test using 'npm test' command. This will run all the test files in the __tests__ directory. The image below shows the output of the test.