- Next.js - Home
- Next.js - Overview
- Next.js - Project Setup
- Next.js - Folder Structure
- Next.js - App Router
- Next.js - Page Router
- Next.js Features
- Next.js - Pages
- Next.js - Data Fetching
- Next.js - ISR
- Next.js - Static File Serving
- Next.js - Pre-Rendering
- Next.js - Partial Pre Rendering
- Next.js - Server Side Rendering
- Next.js - Client Side Rendering
- Next.js Routing
- Next.js - Routing
- Next.js - Nested Routing
- Next.js - Dynamic Routing
- Next.js - Parallel Routing
- Next.js - Imperative Routing
- Next.js - Shallow Routing
- Next.js - Intercepting Routes
- Next.js - Redirecting Routes
- Next.js - Navigation and Linking
- Next.js Configuration
- Next.js - TypeScript
- Next.js - Environment Variables
- Next.js - File Conventions
- Next.js - ESLint
- Next.js API & Backend
- Next.js - API Routes
- Next.js - Dynamic API Routes
- Next.js - Route Handlers
- Next.js - API MiddleWares
- Next.js - Response Helpers
- Next.js API Reference
- Next.js - CLI Commands
- Next.js - Functions
- Next.js - Directives
- Next.js - Components
- Next.js - Image Component
- Next.js - Font Component
- Next.js - Head Component
- Next.js - Form Component
- Next.js - Link Component
- Next.js - Script Component
- Next.js Styling & SEO
- Next.js - CSS Support
- Next.js - Global CSS Support
- Next.js - Meta Data
- Next.js Advanced Topics
- Next.js - Error Handling
- Next.js - Server Actions
- Next.js - Fast Refresh
- Next.js - Internationalization
- Next.js - Authentication
- Next.js - Session Management
- Next.js - Authorization
- Next.js - Caching
- Next.js - Data Caching
- Next.js - Router Caching
- Next.js - Full Route Caching
- Next.js - Request Memoization
- Next.js Performance Optimization
- Next.js - Optimizations
- Next.js - Image Optimization
- Next.js - Lazy Loading
- Next.js - Font Optimization
- Next.js - Video Optimization
- Next.js - Script Optimization
- Next.js - Memory Optimization
- Next.js - Using OpenTelemetry
- Next.js - Package Bundling Optimization
- Next.js Testing
- Next.js - Testing
- Next.js - Testing with Jest
- Next.js - Testing with Cypress
- Next.js - Testing with Vitest
- Next.js - Testing with Playwright
- Next.js Debugging & Deployment
- Next.js - Debugging
- Next.js - Deployment
- Next.js Useful Resources
- Next.js - Interview Questions
- Next.js - Quick Guide
- Next.js - Useful Resources
- Next.js - Discussion
Next.js - CLI
Next.js Command Line Interface (CLI) is built-in tool used to develop, run, built and start Next.js applications. In this chapter, we will discuss Next.js CLI commands, the syntax of CLI commands, and examples of writing commands in Next.js CLI.
Table of Contents
- Next.js CLI Syntax
- Next.js CLI Commands
- Changing Default Port on Next.js CLI
- Using HTTPS in Next.js Development Mode
Next.js CLI Syntax
The CLI of Next.js has two parts, [command] and [option].
npx next [command] [options]
- command: Next.js has a set of predefined commands such as dev, build, start etc.
- options: Each command in Next.js has a set of options. For example, `npx next dev -p 3001`, Here port number 3001 is an `option` of the `dev` command.
Next.js CLI Commands
Following is list of all commands used in Next.js CLI.
| Commands | Description |
|---|---|
| dev | The dev command starts Next.js application in development mode with hot module reloading and error reporting features. |
| build | This creates an optimized production build for the application. |
| start | Starts the Next.js application in production mode. The application should be built before starting production mode. |
| info | This is used to print relevant information about the current system, which can be used to report Next.js bugs. |
| lint | The Lint command runs ESLint for all files in the Next.js directories. It also provides a guided setup to install any required dependencies if ESLint it is not already configured in your application. |
| telemetry | This is used to enable or disable sharing telemetry data about general usage with Next.js. |
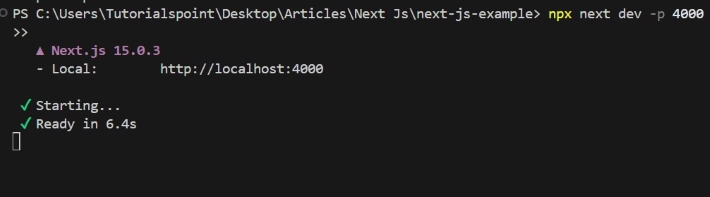
Changing Default Port on Next.js CLI
To run a Next.js application on specific port, you can use the `dev` command along with port number. Following is syntax to change default port number.
npx next dev -p 4000
After running the above command in your terminal, Next.js development mode will start running on `http://localhost:4000/`. Your default browser will open the page automatically. See the image for reference.
Example
Once your server is ready, paste the below code in the `app/page.tsx` file to see your website running on port 4000.
// app/page.tsx

export default function Home() {
    return (
        <div>
            <h1>Welcome to My Next.js App</h1>
            <p>This is the home page.</p>
        </div>
    );
  }
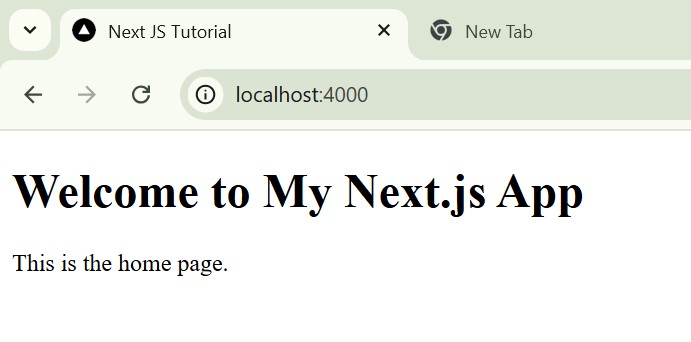
Output
In the output, you can see that Next.js server is running on port 4000.
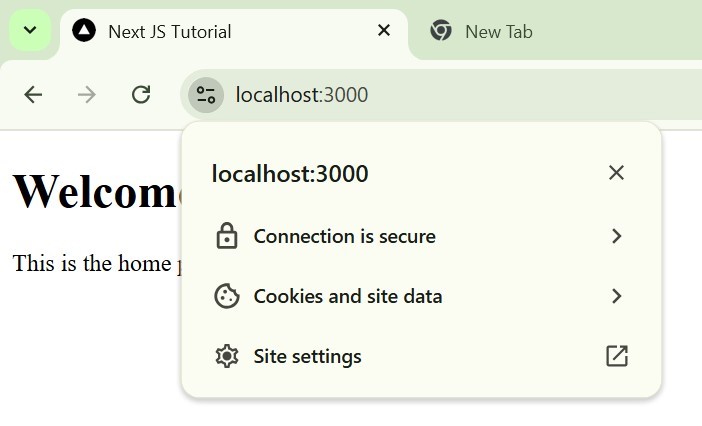
Using HTTPS in Next.js Development Mode
By default, Next.js uses the HTTP protocol for developmental purposes. However, for testing certain features like webhooks or authentication, you can use HTTPS to have a secure environment on localhost. Next.js can generate a self-signed certificate with next dev using the --experimental-https flag. Following is the syntax for command.
npx next dev --experimental-https
When running the above command, Next.js uses `mkcert` to generate self-signed certificates for local development. This will create a CA root certificate stored in the directory.
Example
After running the command, paste the code below on `app/page.tsx`.
// app/page.tsx

export default function Home() {
    return (
        <div>
            <h1>Welcome to My Next.js App</h1>
            <p>This is the home page.</p>
        </div>
    );
  }
Output
You can see that in output we are getting a secure connection.